
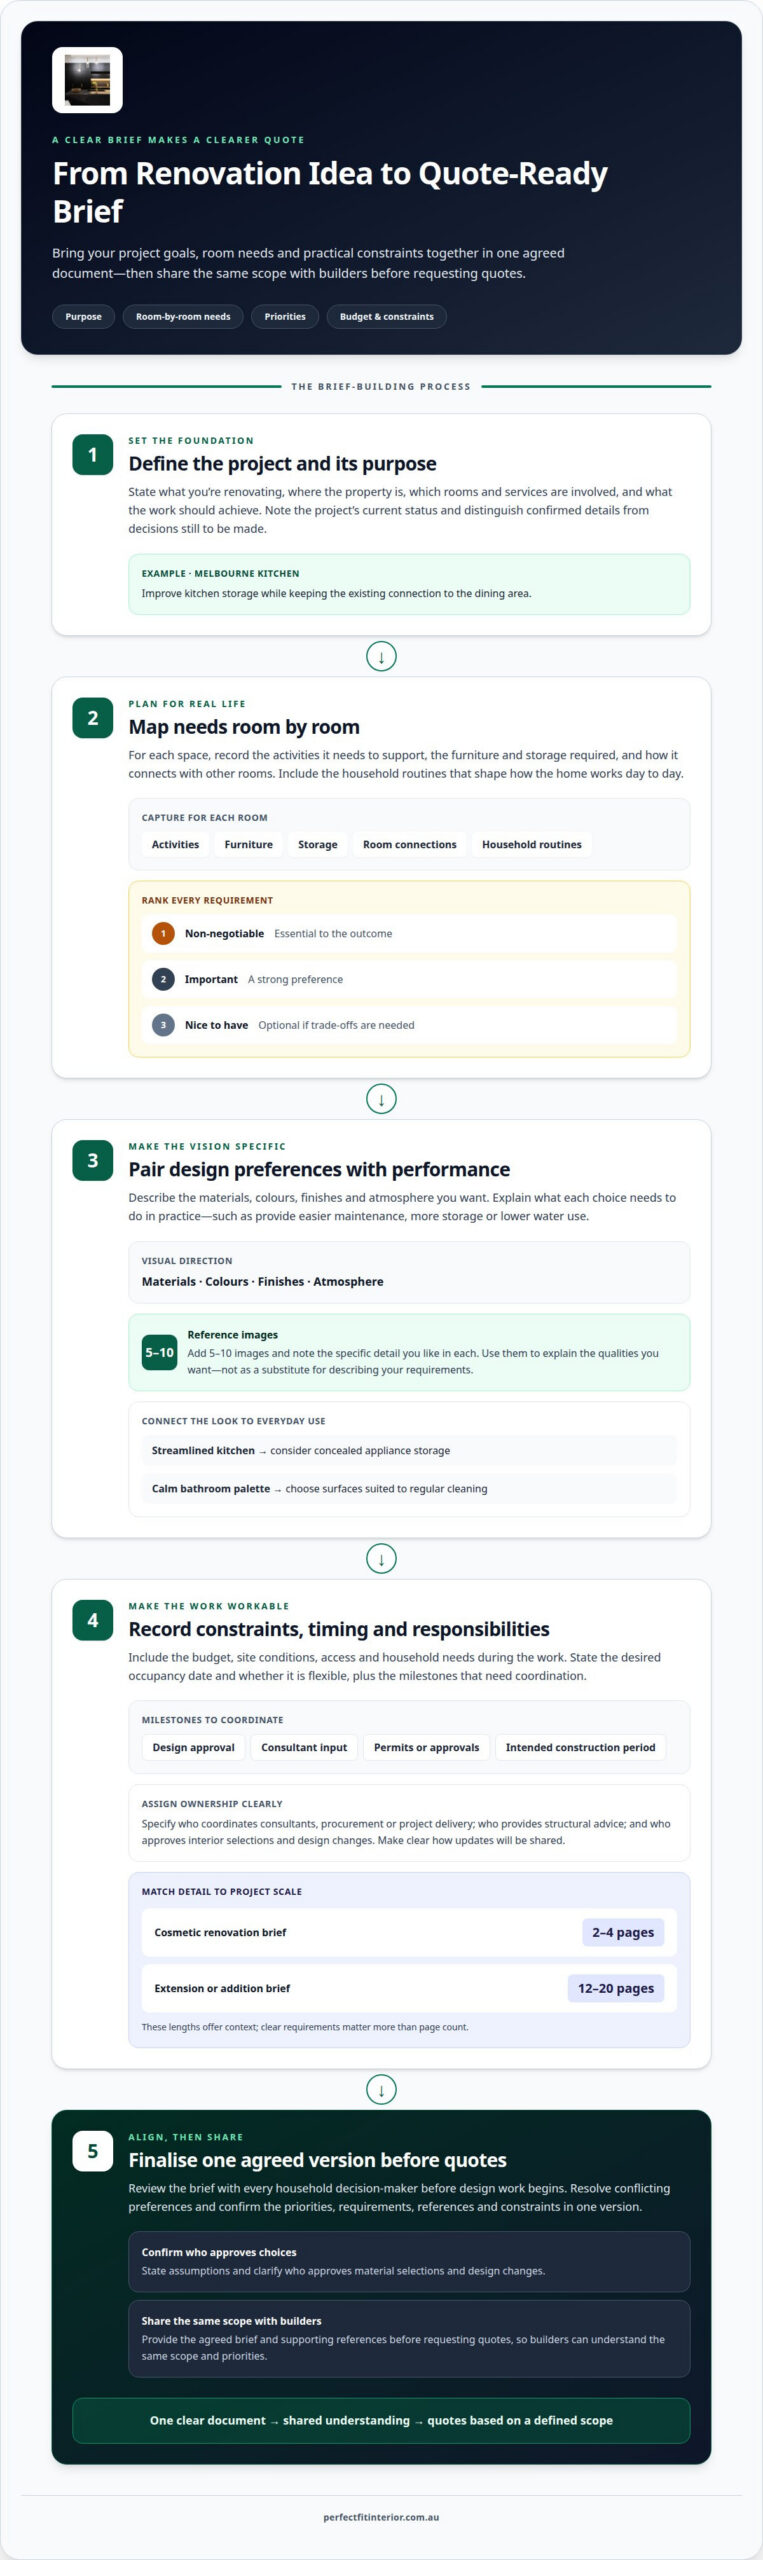
What makes a builder’s quote useful before work begins? Knowing how to write a renovation brief means setting out the project’s purpose, room-by-room needs, priorities, budget and practical constraints in one clear document. Share it with builders before requesting quotes so they understand the same scope and what matters most.
A strong brief connects the look you want with the way you live. Capture daily routines, storage needs, preferred materials and how spaces relate to one another, as well as what is essential and what could change if the budget or site presents limits. Reference images can help convey the atmosphere and finishes you have in mind, especially when you note what appeals to you in each one.
This guide explains how to define renovation goals, plan requirements room by room and account for the routines that shape how your home works. You’ll also learn what to include when sharing the brief with builders, so they can prepare quotes against a clear, considered scope.
Key Takeaways
- Start with the renovation’s purpose, then record the look, feel and performance priorities you want the finished home to deliver.
- Define the project scope, decision-makers and consultant responsibilities so everyone understands their role.
- Map each room’s activities, furniture and storage needs, then separate essential requirements from nice-to-haves.
- Describe household routines and how spaces connect to make the renovation work for everyday life.
- Share the same clear scope and supporting references with builders before requesting quotes.
What is a property renovation brief?
A renovation brief records what the work should achieve, which rooms are involved, and the design, practical and site requirements builders need to understand. Set goals as must-haves, priorities or optional preferences, then share a specific example: updating a Melbourne home’s kitchen for better storage while keeping its existing connection to the dining area.
Give an architect or builder the project scope, room needs, style preferences, performance targets, budget, site constraints and timing expectations. A useful brief can be a written document with reference images, created digitally or scanned for sharing.
-
Record Design Preferences and Performance Targets
Describe the interior you want, then explain what each preference means in practice. Include materials, colours, finishes and the atmosphere you’re aiming for, alongside performance goals such as easier maintenance, more storage or lower water use. Add 5-10 reference images, and note the specific detail you like in each. For Melbourne cabinetry planning, clear requirements can help a local cabinet maker in Melbourne understand the intended finish.
-
Set Renovation Goals and Priorities
List the outcomes the renovation should deliver, then rank each requirement as non-negotiable, important or nice to have. For example, a household might treat improved kitchen storage as essential, a particular benchtop finish as important, and decorative shelving as optional. This order makes trade-offs clearer if the site, scope or budget affects a design choice. Avoid broad goals such as “make it better” without describing the change you need.
-
Balance Design Form and Function
Pair each visual choice with how the room will be used. A streamlined kitchen might need concealed appliance storage, while a calm bathroom palette still needs surfaces suited to regular cleaning. Check that the desired layout, materials and finishes support daily activities rather than relying on inspiration images alone. A beautiful reference is useful when you explain which qualities you want to bring into your home.
-
Include a Clear Australian Home Example
Use a short project summary to show how the details fit together. For example: “Renovate the kitchen in our Melbourne home to improve meal preparation and storage. Keep the dining area connected, provide space for everyday appliances, and use durable, easy-care finishes in a warm, light interior.” This sample identifies the room, purpose, spatial relationship and finish direction without presenting itself as a complete specification.
-
Finalise the Brief Before Design Work Begins
Review the document with every household decision-maker, resolve conflicting preferences and agree on the priorities before design work starts. Check that room requirements, images, performance targets and project constraints appear in one version. A detailed, agreed brief can reduce communication problems, support more accurate builder quotes and lower the risk of late design changes. State assumptions, such as who approves a material choice, rather than leaving them unstated.
What is a design brief?
A design brief turns a renovation idea into instructions the project team can use. For a Melbourne extension, it can clarify the work, site, decisions and coordination needed before design and construction progress.
- Identify the project type, location and current status. State whether the work is a bathroom renovation, extension or another project, then give the property’s location and the stage reached. For example, note whether a site survey is available or a development approval process is underway. These details help an architect understand the starting point and distinguish confirmed information from decisions still to be made.
-
Define Project Scope and Responsibilities
Describe which rooms and services the project covers, then assign responsibility clearly across the team. State whether the design team will coordinate consultants, manage procurement or oversee project delivery, or whether you’ll engage other consultants directly. For example, name who coordinates structural advice and who approves interior selections. Check for overlapping duties, as unclear ownership can leave essential decisions unmade.
-
Set Timelines, Milestones and Constraints
Set out the desired occupancy date, whether it’s flexible, and the milestones that shape progress. Include design approval, consultant input, relevant permits or approvals, and the intended construction period as stages to coordinate. Identify constraints such as access, existing conditions or household needs during the work. For example, a family staying in the home may need decisions sequenced around continued use of key rooms.
-
Adjust Detail to Project Scale
Match the brief’s detail to the amount of work involved. A cosmetic renovation brief can be two to four pages, while an extension or addition brief can be twelve to twenty pages. These lengths offer context, not a substitute for clear requirements. A bathroom refresh may need concise scope and finish information; an extension needs room relationships, consultant roles and more detailed project priorities.
- Share one agreed version with every project team member. Include the architect, relevant consultants and people responsible for approvals, so each person works from the same scope and priorities. A digital document with labelled sections helps readers find decisions and constraints. Record who approves design changes and how updates will be shared; otherwise, team members may rely on different instructions.
- Finalise the brief at the end of the inception phase, before design work begins. Ask all decision-makers to review and sign off on the agreed document. Confirm that the project type, site status, scope, responsibilities, milestones and occupancy needs are represented. After sign-off, treat the brief as a working document and update it when an agreed project decision changes the direction or requirements.
Functional requirements and room-by-room planning
Define each room’s purpose, activities, storage, materials and finishes, then explain how the spaces connect. Include the project’s budget approach, timing, site constraints and any planning or approval considerations relevant to the Melbourne property.
-
Define Scope, Rooms and Finishes
List the rooms included and describe the work required in each. For a kitchen, specify meal preparation, appliance storage, seating and the preferred benchtop or cabinetry finish. Note existing features to retain, remove or adapt. Check that each material choice suits the room’s use and maintenance needs, rather than selecting finishes on appearance alone.
- Break room requirements into activities, furniture and storage. In a bathroom, identify who uses it, where towels and toiletries need to go, and whether the layout should support more than one user. For a living area, note seating, circulation and storage for household items. A survey can help clarify existing dimensions; record assumptions separately from measured details.
- Set the project budget and explain whether it covers the whole renovation or is divided by room or phase. Allow for demolition, GST treatment and a contingency of 10 to 15 per cent. If the available budget is uncertain, describe which outcomes matter most so design options can be considered against those priorities. Avoid treating every finish as equally essential.
- Set out the planning sequence and timing expectations. Renovation planning and permits typically take one to two months; construction typically takes four to twelve weeks, followed by two to four weeks for finishing trades. Treat these periods as planning estimates, not fixed promises. Identify the desired move-in date, approval milestones and any household arrangements that affect when work can proceed.
-
Allow for Future Flexibility
Consider how household needs could change and document adaptable requirements. A study might later serve as a guest room, or storage may need to accommodate changing equipment. Prioritise flexible room use, accessible movement or future expansion where these matter to the household. Avoid committing space to a single function if another arrangement could support longer-term needs.
- Record planning considerations for the property before finalising the scope. Note known site constraints, the current status of any survey, and whether council or other approval steps may affect the proposed work. A Melbourne extension, for example, may need different planning discussions from an interior room update. Keep these items visible so they inform design and scheduling.
Understanding the needs and routines of the people using the space
Record who uses each area, what they do there and how routines shape the home. A weekday breakfast, shared bathroom or weekend garden gathering can reveal practical requirements that a floor plan alone may miss.
- Observe how household members use the current home across a typical day. Note where morning traffic builds, where bags collect and which spaces sit unused. For example, a family that prepares breakfast together may need clear movement between the kitchen, dining area and pantry. Describe what works now, what causes friction and which routines the renovation should support.
- Gather input from everyone who helps run the home, not only the decision-makers. A partner, older child or regular caregiver may notice details others overlook, such as where cleaning supplies belong or when a bathroom is busiest. Ask each person to describe their essential routines and concerns. Compare those comments with the desired design, then record any practical conflicts.
-
List Rooms and Outdoor Living Spaces
Write down every indoor and outdoor space the project should address. Include bedrooms, bathrooms, kitchen, living areas, laundry, entry storage and places such as a balcony, courtyard or garden. For each space, describe its users and main activities. Check that shared or secondary spaces aren’t overlooked, especially if they support daily routines, entertaining or quiet time.
-
Map Circulation and Adjacencies
Describe how people move between rooms and outdoor areas, then note which spaces should connect or remain separate. For example, a direct route from the kitchen to an outdoor dining area can suit frequent meals outside. Bedrooms may need distance from a lively living zone. Identify pinch points, crossing paths and privacy needs rather than relying on room names alone.
- Consider how often each room is used and how its needs may change. A study used daily for working has different requirements from a guest room used occasionally. Note future possibilities, such as a play area becoming a quiet retreat, without assuming household needs will stay fixed. This gives the design team a practical basis for considering adaptable spaces.
- Bring the observations together as a short household profile. Describe who uses the home, typical routines, preferred activities and critical needs, such as quiet study or accessible storage. Then connect each requirement to a room or route. For instance, placing coats near the entry may ease school-day departures. This concise summary keeps lifestyle priorities visible during design decisions.
Sharing the brief with builders before requesting quotes
Give each builder the same complete document before requesting a quote. A key part of how to write a renovation brief is making the scope clear enough for builders to understand the same project and price comparable work.
- Prepare one current version and give it a clear file name. Include the property location, renovation scope, room requirements, priorities and known constraints. Keep the writing direct, then organise supporting documents separately. For example, label the floor plan, survey and reference images so builders can locate each item quickly. If cabinetry is involved, make its requirements easy to find alongside other cabinet-maker details.
- Send the same material to every builder you’re approaching. Include relevant plans, images and notes rather than describing key details differently in separate messages. If one builder receives an updated layout, share that version with the others too. Consistent information reduces the chance that quotes are based on different assumptions, including for cabinetry work in Melbourne.
- Make the requested scope easy to find. State which rooms are included, what work you want completed and which existing features should remain. For a kitchen renovation, distinguish between replacing cabinetry and retaining existing appliances. Note exclusions as well, such as a room outside the renovation area, so the quote doesn’t rely on unstated assumptions. Describe service-related work clearly and specifically.
- Pair reference images with short written explanations. Describe the specific feature that matters, such as a drawer arrangement, timber tone or tile finish. Separate inspiration from firm requirements by labelling each clearly. A photo may show several design elements, but an annotation can direct attention to the detail you want considered, including relevant cabinetry specifications.
- Identify decisions that could affect how builders interpret the work. Mark measured information separately from estimates, and list unresolved selections or site questions. If a finish is undecided, describe the intended appearance and performance. This gives builders useful context without presenting an open choice as a final specification, whether it concerns a finish or custom cabinetry requirements.
- Ask builders to respond to the same scope. Request clear descriptions of included work, exclusions, assumptions, proposed materials and project stages. If a quote describes the work differently from your document, compare the wording carefully. Similar-looking quotes can include different work, so review the stated inclusions rather than relying only on a headline total.
- Record clarifications and distribute material updates to everyone quoting. If a site discussion changes the layout or finish, revise the document and identify what changed. Knowing how to write a renovation brief also means keeping its instructions current. A dated revision note helps distinguish the latest version from earlier ones and gives builders a consistent basis for updating their quotes.
Ready to discuss your renovation scope? Contact Perfect FIT Interior to talk through your project.
Perfect FIT Interior
Perfect FIT Interior can help turn a clear renovation brief into a considered home project. For broader changes or a bathroom update, an organised brief gives the team a useful starting point for understanding your priorities, required spaces and preferred finishes.
Perfect FIT Interior offers Home Renovation and Bathroom Renovation, managing projects from initial 3D design and measurement through to installation. Sharing your room requirements, reference images and agreed priorities helps shape the discussion around how the finished spaces should look and function.
Contact Perfect FIT Interior to discuss your renovation brief and next steps.
Turn your renovation brief into a confident next step
A renovation brief can keep guiding decisions as your plans develop. Treat it as a practical reference, not a document to put aside once builders have quoted. If a new idea emerges, compare it with your agreed priorities and update the brief when the project direction genuinely changes. This habit helps keep later choices connected to the home you want to create.
Knowing how to write a renovation brief gives you a clearer starting point for conversations about the work ahead. Perfect FIT Interior offers kitchen renovation in Melbourne, home renovation and bathroom renovation, so you can discuss your plans when you’re ready.
Thoughtful preparation can turn your vision for home into a considered plan.
Frequently Asked Questions
Can I write the brief myself, or should the architect do it?
You can draft the brief yourself, then work with an architect to refine design and technical requirements. Start with what you want to change and why, using everyday language. For example, describe a laundry that needs bench space for sorting and folding rather than prescribing a layout. The architect can help translate your priorities into design decisions and identify where more detailed information is needed.
Should I include inspiration images in the brief?
Yes. Inspiration images can communicate qualities that are difficult to describe, such as the warmth of timber or the visual weight of cabinetry. Add a short caption explaining what each image illustrates, and distinguish the preferred detail from other features shown. For example, you might like the pendant lighting in a photo but not its colour scheme. This helps prevent a reference from being read as a request to copy the entire room.
What if I don’t know my exact budget yet?
State the budget range you’re comfortable discussing, and separate firm limits from preferences. If you’re unsure, ask the architect to explore options at two or three budget levels. Compare what each option includes, such as room coverage, materials and finish choices, rather than treating them as interchangeable totals. This gives the design conversation a practical framework while you decide which outcomes matter most.
When should the brief be finalised?
Finalise and agree on the brief before design work begins. Bring the relevant decision-makers together to settle priorities, resolve conflicting preferences and approve one shared version. For example, confirm whether a second bathroom is essential or simply preferred before plans develop around that assumption. Keep later revisions clear by recording what changed and who agreed, so the project team can follow the current direction.
What is a renovation brief and what should it include?
A renovation brief is a working document that explains the purpose and requirements of proposed home improvements. It should identify the property and project type, affected rooms, desired outcomes, design preferences, practical needs, constraints and decision-makers. For example, a brief for a Melbourne extension could explain which household activities need more room and how the new area should connect with existing living spaces.
How do you write a renovation brief step by step?
Begin by describing the project and why it matters. Then record the rooms involved, household needs, preferred look, site constraints and priorities. Add supporting plans or images, and clarify who approves decisions. For example, a bathroom update might prioritise easier storage and a calmer finish palette. Review the document with everyone making project decisions, then share the agreed version with the project team.
How do you include a realistic renovation budget and contingency in a brief in Australia?
Set out the total project budget and clarify whether it includes demolition, GST and design-related costs. Identify which items are known and where selections or site conditions may affect the final scope. A contingency of 10 to 15 per cent can be included for unexpected issues. Keep the contingency distinct from the planned work, so it remains visible as a reserve rather than extra scope.
How should you document measurements, photos, plans and inspiration for a renovation brief?
Organise files by room and label each item clearly, such as “kitchen existing plan” or “bathroom finish reference”. Note when measurements were taken and whether they came from a survey or an approximate household measurement. Use photos to show existing conditions, and add captions identifying what needs attention. Keep inspiration images separate from property records, so visual ideas aren’t mistaken for measured plans or existing features.
Disclaimer
All right reserve for Perfect Fit Interior – InnovateX Group PTY LTD